Teleport---堡垒机配置手册
snow chuai汇总、整理、撰写---2020/08/02
1. 安装及配置Teleport
1.1 下载并安装Teleport
[root@srv1 ~]# tar xfz teleport-server-linux-x64-3.2.2.tar.gz [root@srv1 ~]# cd teleport-server-linux-x64-3.2.2/ [root@srv1 teleport-server-linux-x64-3.2.2]# ./setup.sh # 安装Teleport
[]===========================================================================[] | Teleport Server Installation | |===========================================================================| | ver: 3.2.2 | | author: apex.liu@qq.com | []===========================================================================[]
Welcome to install Teleport Server!
NOTICE: There are a few steps need you enter information or make choice, if you want to use the DEFAULT choice, just press `Enter` key. Otherwise you need enter the highlight character to make choice.
Prepare installation...
- check local installation ... [not exists]
Set installation path [/usr/local/teleport]: # 指定安装Teleport的默认安装路径,可直接回车 - copy [/root/teleport-server-linux-x64-3.2.2/data/bin] -> [/usr/local/teleport/bin] - copy [/root/teleport-server-linux-x64-3.2.2/data/www] -> [/usr/local/teleport/www] - copy [/root/teleport-server-linux-x64-3.2.2/data/tmp/etc] -> [/usr/local/teleport/data/etc] process [daemon.in] to [/etc/init.d/teleport] process [start.sh.in] to [/usr/local/teleport/start.sh] process [stop.sh.in] to [/usr/local/teleport/stop.sh] process [status.sh.in] to [/usr/local/teleport/status.sh]
start services... starting teleport web ... [done] starting teleport core server ... [done]
check services status... teleport web server is running. teleport core server is running.
--==[ ALL DONE ]==--1.2 安装及配置MariaDB
[root@srv1 ~]# sed -i -e "s/\]$/\]\npriority=10/g" /etc/yum.repos.d/CentOS-SCLo-scl.repo [root@srv1 ~]# sed -i -e "s/\]$/\]\npriority=10/g" /etc/yum.repos.d/CentOS-SCLo-scl-rh.repo
[root@srv1 ~]# sed -i -e "s/enabled=1/enabled=0/g" /etc/yum.repos.d/CentOS-SCLo-scl.repo [root@srv1 ~]# sed -i -e "s/enabled=1/enabled=0/g" /etc/yum.repos.d/CentOS-SCLo-scl-rh.repo
[root@srv1 ~]# yum --enablerepo=centos-sclo-rh install rh-mariadb103-mariadb-server -y
2) 配置并启用MariaDB环境 [root@srv1 ~]# scl enable rh-mariadb103 bash [root@srv1 ~]# mysql -V mysql Ver 15.1 Distrib 10.3.13-MariaDB, for Linux (x86_64) using EditLine wrapper
[root@srv1 ~]# vim /etc/profile.d/rh-mariadb103.sh source /opt/rh/rh-mariadb103/enable export X_SCLS="`scl enable rh-mariadb103 'echo $X_SCLS'`"
[root@srv1 ~]# vim /etc/my.cnf.d/charaset.cnf # 修改MariaDB默认字符集(latin1)改为utf8mb4 [mysqld] character-set-server = utf8mb4
[client] default-character-set = utf8mb4
[root@srv1 ~]# systemctl enable --now rh-mariadb103-mariadb
[root@srv1 ~]# mysql_secure_installation
NOTE: RUNNING ALL PARTS OF THIS SCRIPT IS RECOMMENDED FOR ALL MariaDB SERVERS IN PRODUCTION USE! PLEASE READ EACH STEP CAREFULLY! In order to log into MariaDB to secure it, we'll need the current password for the root user. If you've just installed MariaDB, and you haven't set the root password yet, the password will be blank, so you should just press enter here.
Enter current password for root (enter for none): # enter OK, successfully used password, moving on...
Setting the root password ensures that nobody can log into the MariaDB root user without the proper authorisation.
Set root password? [Y/n] y # 设置root密码 New password: Re-enter new password: Password updated successfully! Reloading privilege tables.. ... Success!
By default, a MariaDB installation has an anonymous user, allowing anyone to log into MariaDB without having to have a user account created for them. This is intended only for testing, and to make the installation go a bit smoother. You should remove them before moving into a production environment.
Remove anonymous users? [Y/n] y # 移除anonymous账户 ... Success!
Normally, root should only be allowed to connect from 'localhost'. This ensures that someone cannot guess at the root password from the network.
Disallow root login remotely? [Y/n] y # 禁用root远程登录 ... Success!
By default, MariaDB comes with a database named 'test' that anyone can access. This is also intended only for testing, and should be removed before moving into a production environment.
Remove test database and access to it? [Y/n] y # 移除test数据库 - Dropping test database... ... Success! - Removing privileges on test database... ... Success!
Reloading the privilege tables will ensure that all changes made so far will take effect immediately.
Reload privilege tables now? [Y/n] y # 重新加载privilege ... Success!
Cleaning up...
All done! If you've completed all of the above steps, your MariaDB installation should now be secure.
Thanks for using MariaDB!1.3 配置Teleport
mysql> grant all privileges on teleport.* to teleport@'localhost' identified by 'password'; Query OK, 0 rows affected (0.00 sec)
mysql> grant all privileges on teleport.* to teleport@'%' identified by 'password'; Query OK, 0 rows affected (0.00 sec)
mysql> flush privileges; Query OK, 0 rows affected (0.00 sec)
mysql> exit Bye
2) 修改Teleport Server数据库 [root@srv1 ~]# vim /usr/local/teleport/data/etc/web.ini # 修改[database]区段内容,如下 [database]
; database in use, should be sqlite/mysql, default to sqlite. # 去掉注释,并将类型改为mysql type=mysql
; sqlite-file=/usr/local/teleport/data/db/teleport.db
# 去掉注释,并指定MariaDB的数据库的iP mysql-host=127.0.0.1
# 去掉注释,并指定数据库所监听的端口 mysql-port=3306
# 去掉注释,指定teleport所使用的数据库名 mysql-db=teleport
# 去掉注释,指定teleport所使用的前缀 mysql-prefix=tp_
# 去掉注释,指定teleport数据库所需要的账户 mysql-user=teleport
# 去掉注释,指定teleport数据库所需要的账户密码 mysql-password=password
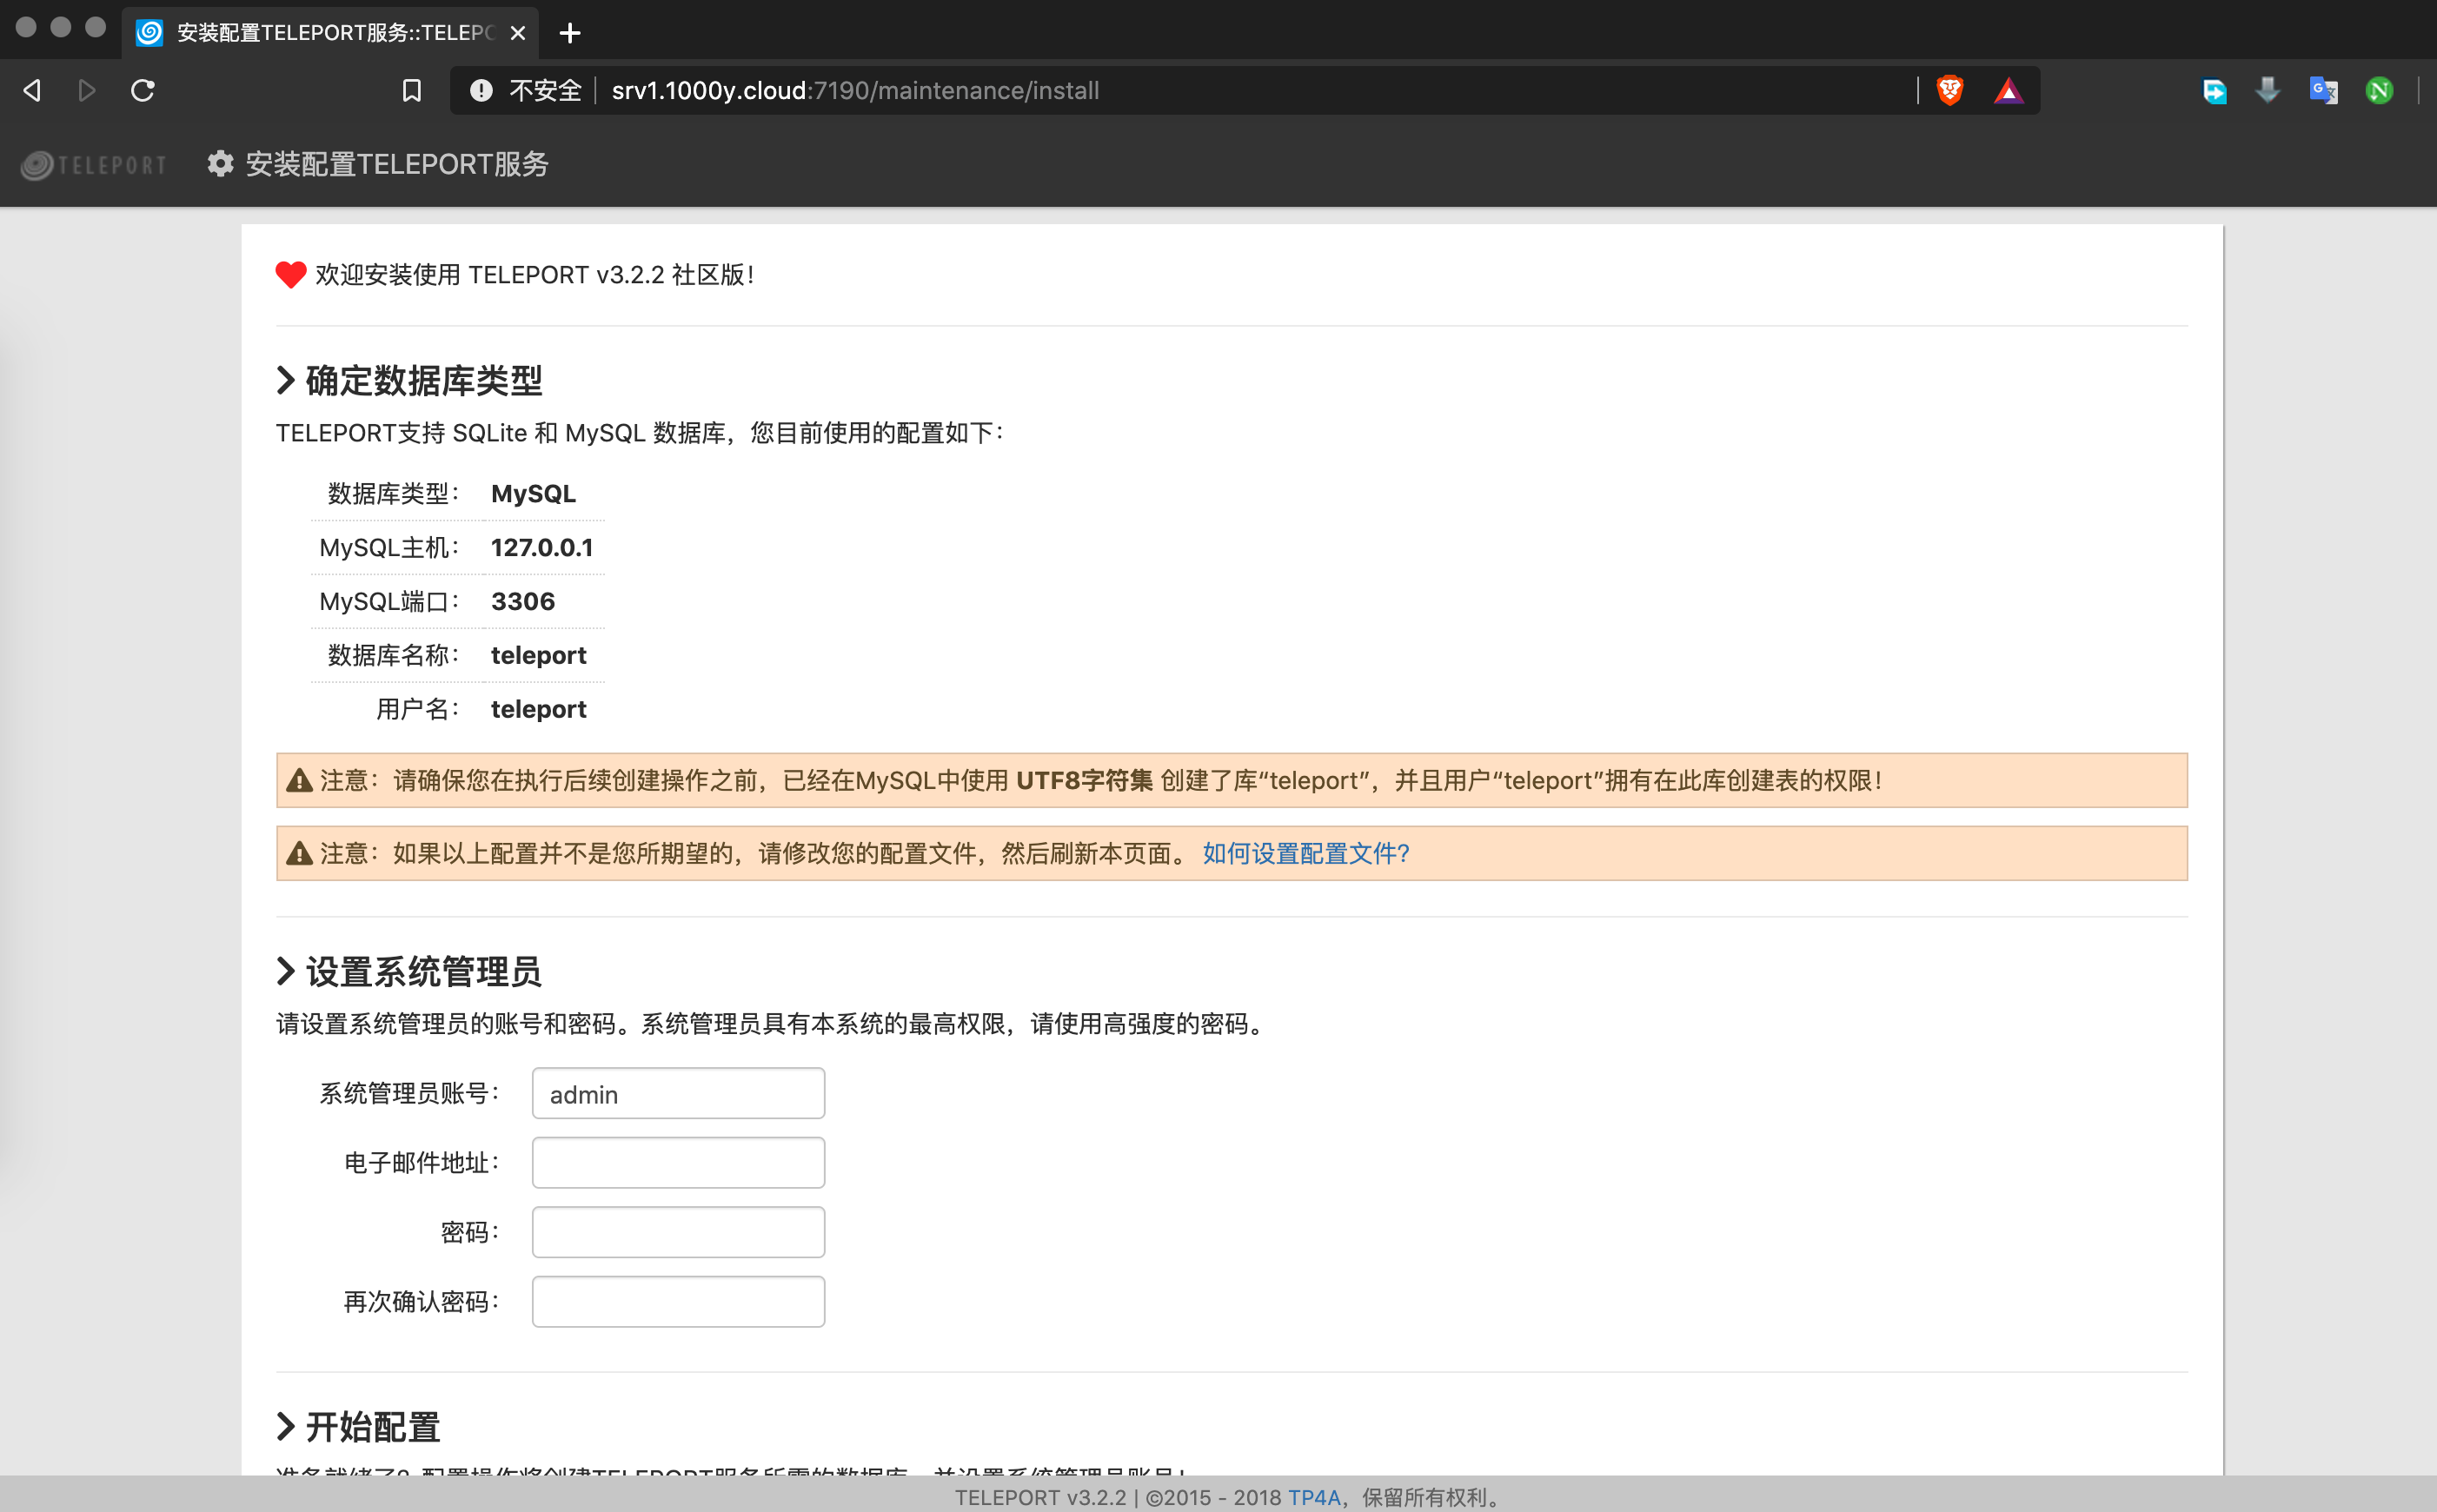
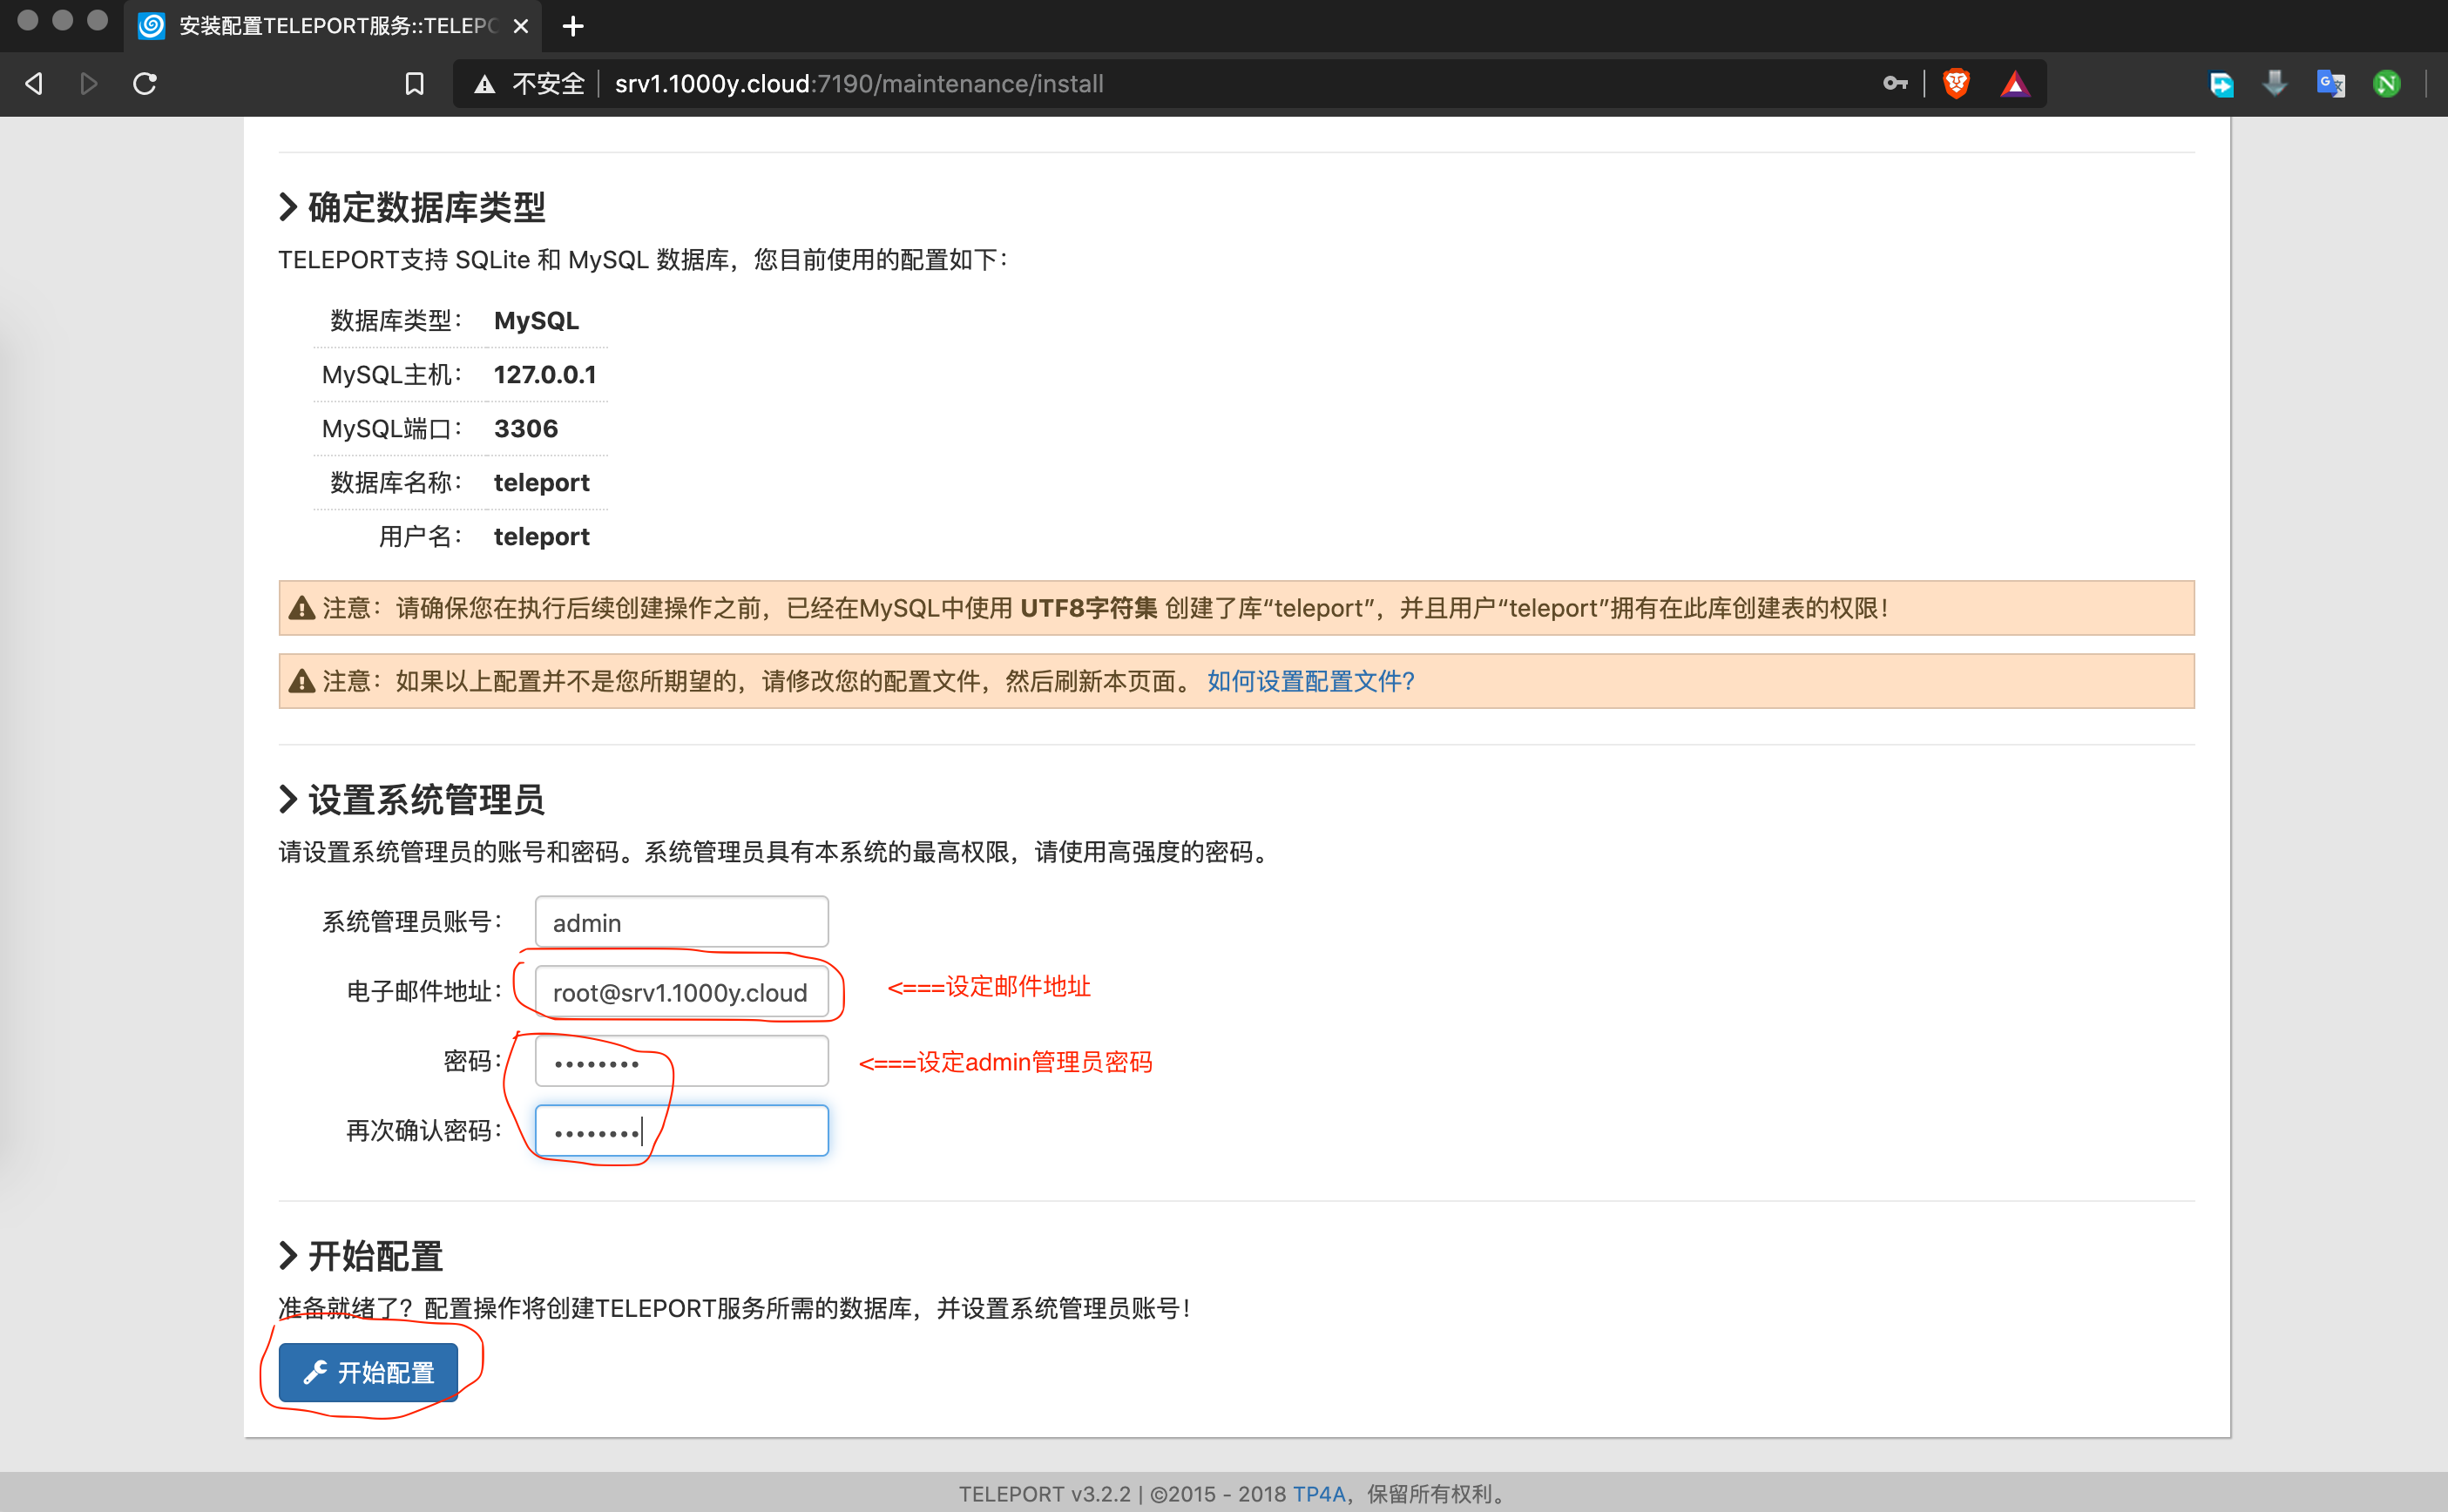
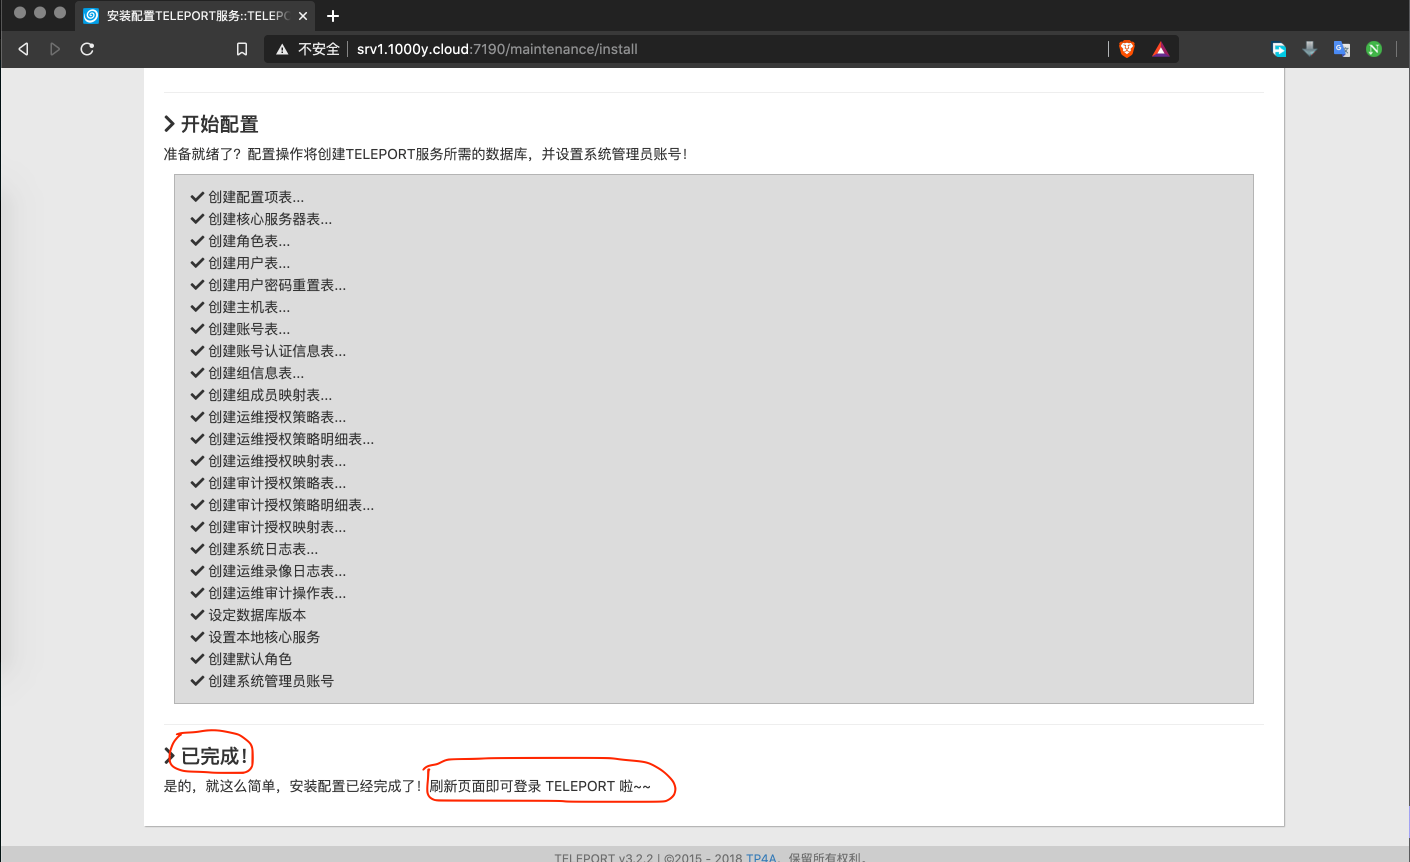
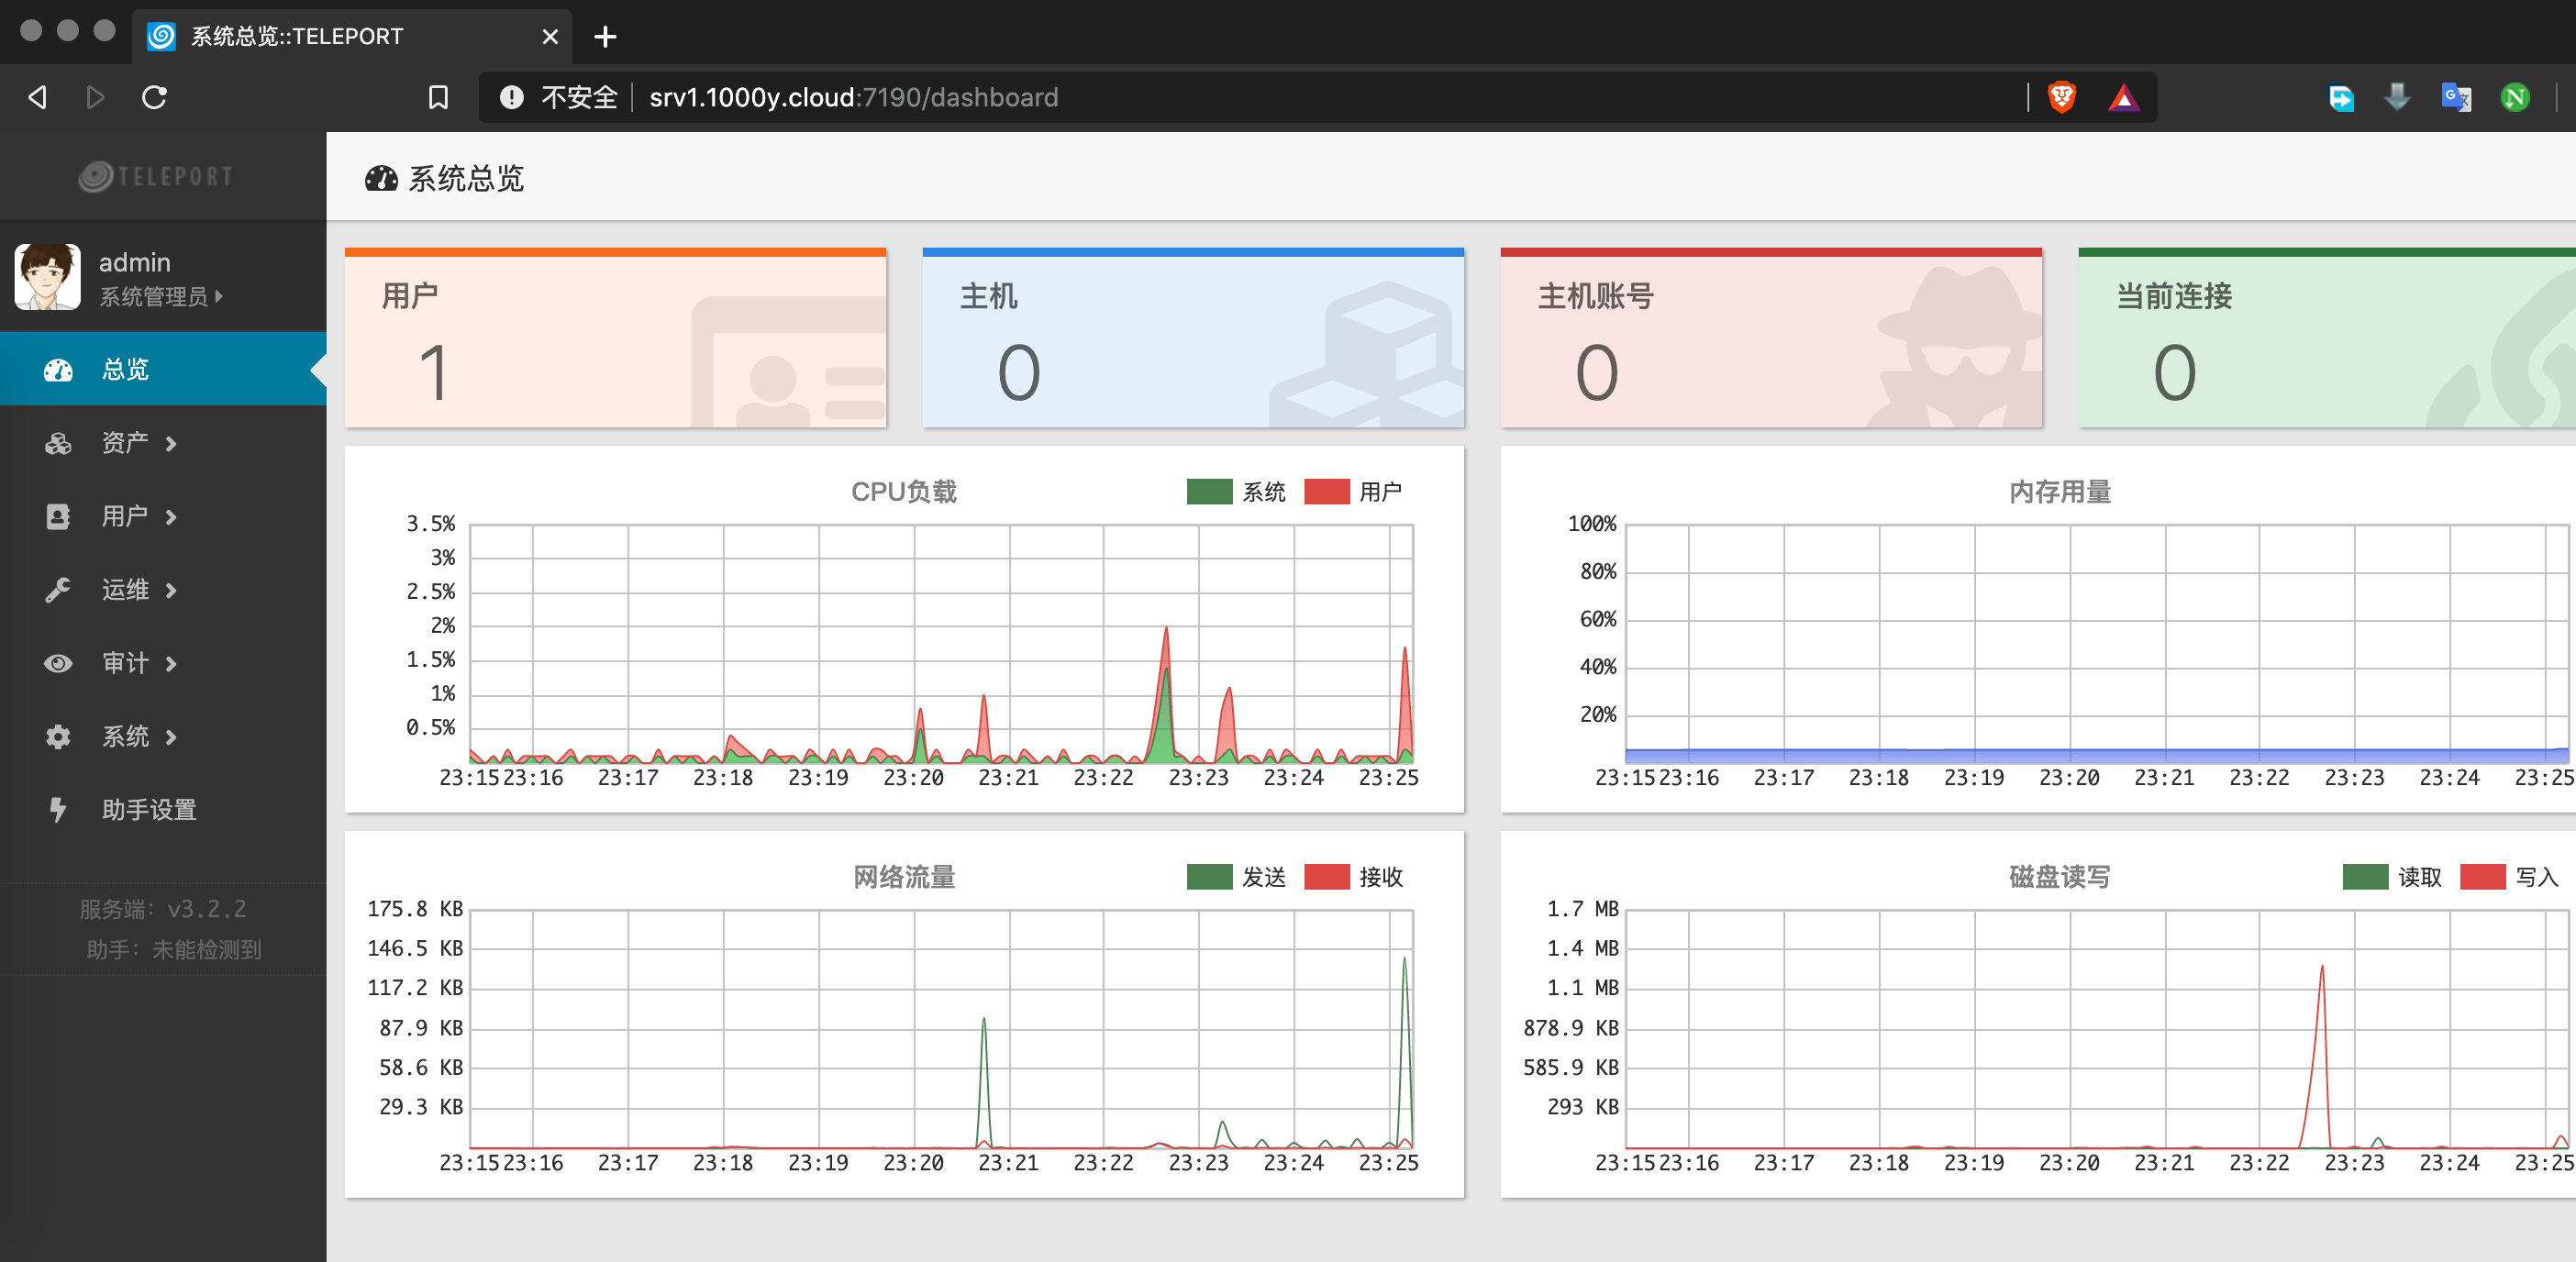
2. 初始化并访问Teleport
[浏览器]===>http://$srv_ip:7190 |

更多使用、升级、维护等可参考======>https://docs.tp4a.com/