Squid配置手册
snow chuai汇总、整理、撰写---2020/2/24
1. 安装并配置Squid
1) 安装软件
[root@srv1 ~]# yum install squid -y

2) 配置squid
[root@srv1 ~]# vim /etc/squid/squid.conf
# 于26行,添加如下内容
acl lan src 192.168.10.0/24

http_access allow localhost
# 于54行,添加如下内容
http_access allow lan

# 于文件末尾,添加如下内容
request_header_access Referer deny all
request_header_access X-Forwarded-For deny all
request_header_access Via deny all
request_header_access Cache-Control deny all

# 不显示IP地址
forwarded_for off

[root@srv1 ~]# systemctl enable --now squid

3) 防火墙设定
[root@srv1 ~]# firewall-cmd --add-service=squid --permanent
success
[root@srv1 ~]# firewall-cmd --reload
success
|
2. 客户端设定
2.1 CLI全局设定
1) profile配置
[root@client ~]# vim /etc/profile
......
......
......
......
......
......

# 于文件最尾部追加如下内容
MY_PROXY_URL="http://srv1.1000cc.net:3128/"
HTTP_PROXY=$MY_PROXY_URL
HTTPS_PROXY=$MY_PROXY_URL
FTP_PROXY=$MY_PROXY_URL
http_proxy=$MY_PROXY_URL
https_proxy=$MY_PROXY_URL
ftp_proxy=$MY_PROXY_URL

export HTTP_PROXY HTTPS_PROXY FTP_PROXY http_proxy https_proxy ftp_proxy
export NO_PROXY=localhost,127.0.0.1,*.1000y.cloud

[root@client ~]# source /etc/profile

2) yum配置
[root@client ~]# vim /etc/yum.conf
# 于文件最尾部追加如下内容
proxy=http://srv1.1000cc.net:3128/

3) wget配置
[root@client ~]# vim /etc/wgetrc
# 于文件最尾部追加如下内容
http_proxy = http://srv1.1000cc.net:3128/
https_proxy = http://srv1.1000cc.net:3128/
ftp_proxy = http://srv1.1000cc.net:3128/

4) wget/yum等测试
|
2.2 浏览器设置

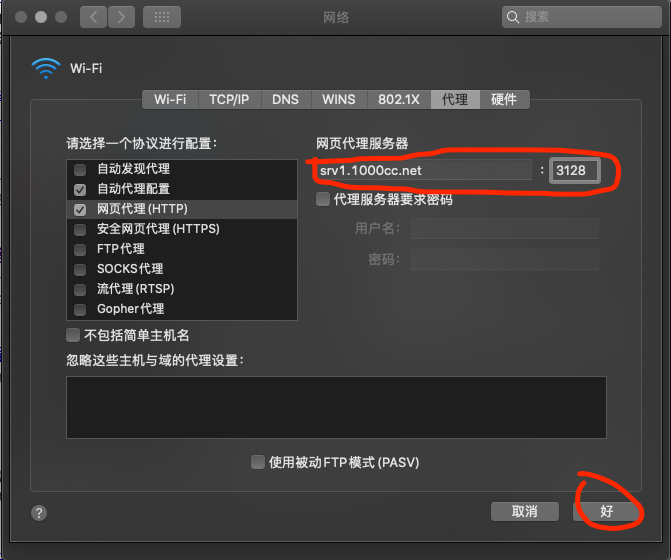
# 其他浏览器请自行查询.
|
3. 基本认证
1) 配置squid
[root@srv1 ~]# vim /etc/squid/squid.conf
acl lan src 192.168.10.0/24
# 于26行之后,添加如下内容
auth_param basic program /usr/lib64/squid/basic_ncsa_auth /etc/squid/.htpasswd
auth_param basic children 5
auth_param basic realm Squid Basic Authentication
auth_param basic credentialsttl 5 hours
acl password proxy_auth REQUIRED
http_access allow password

2) 设定验证账户
[root@srv1 ~]# yum install httpd-tools -y

[root@srv1 ~]# htpasswd -c /etc/squid/.htpasswd snow
New password:
Re-type new password:
Adding password for user snow

3) 客户端设定-CLI
[root@client ~]# vim /etc/profile
修改MY_PROXY_URL字段,添加账户和密码
MY_PROXY_URL="http://snow:123456@srv1.1000cc.net:3128/"

HTTP_PROXY=$MY_PROXY_URL
HTTPS_PROXY=$MY_PROXY_URL
FTP_PROXY=$MY_PROXY_URL
http_proxy=$MY_PROXY_URL
https_proxy=$MY_PROXY_URL
ftp_proxy=$MY_PROXY_URL

export HTTP_PROXY HTTPS_PROXY FTP_PROXY http_proxy https_proxy ftp_proxy

[root@client ~]# vim /etc/yum.conf
......
......
......
......
......
......

proxy=http://srv1.1000cc.net:3128/
于文件最后追加如下内容
proxy_username=snow
proxy_password=123456

[root@client ~]# vim /etc/wgetrc
......
......
......
......
......
......

于文件最后追加如下内容
proxy_user = snow
proxy_passwd = 123456
|
4. 反向代理
1) 配置squid
[root@srv1 ~]# vim /etc/squid/squid.conf
# 在54行之上追加如下内容(绿色部分)
http_access allow all
# And finally deny all other access to this proxy
http_access deny all

# 修改59行,定义后台web server
http_port 80 accel defaultsite=srv2.1000cc.net

# 修改62行注释,定义磁盘缓存大小及1级目录,2及目录数量
cache_dir ufs /var/spool/squid 100 16 256

# 于最后追加如下内容
cache_peer srv2.1000cc.net parent 80 0 no-query originserver
# 内存cache大小
cache_mem 256 MB
# 定义代理的FQDN
visible_hostname srv1.1000cc.net

[root@srv1 ~]# systemctl enable --now squid

2) web配置
[root@srv2 ~]# yum install httpd -y

[root@srv2 ~]# echo "srv2.1000cc.net" > /var/www/html/index.html

[root@srv2 ~]# systemctl enable --now httpd

3) 客户端测试
[浏览器]===>http://srv1.1000cc.net

|
如对您有帮助,请随缘打个赏。^-^