HAProxy配置手册

snow chuai汇总、整理、撰写---2020/2/2


1. 安装HAproxy
1) 拓扑
                           |-------------|
                           |    Client   |
                           |    node5    |
                           |-------------| 
                                  |
                                  |
                           |-------------|
                           |   HA Proxy  |
                           |    node1    |
                           |-------------| 
                                  |
                                  |
            |--------------|      |       |--------------|
            +  WEB Server  +--------------+  WEB Server  +
            |     node2    |              |     node3    |
            |--------------|              |--------------|
2) 安装HAproxy程序 [root@node1 ~]# yum install haproxy -y
2. 配置HAproxy实现Layer7
1) 配置HAProxy配置文件
[root@node1 ~]# mv /etc/haproxy/haproxy.cfg /etc/haproxy/haproxy.cfg.bak
[root@node1 ~]# vim /etc/haproxy/haproxy.cfg
global  # 全局配置
    log 127.0.0.1 local2 info  # 定义收集的日志信息及日志设备
    chroot /var/lib/haproxy
    pidfile /var/run/haproxy.pid
    maxconn 256  # 最大连接数
    user haproxy  # 定义haproxy的属主
    group haproxy  # 定义harpoxy属组
    daemon
defaults mode http # 定义运行模式为http--Layer7工作模式 log global option httplog # 获取http的request日志 timeout connect 10s # 后台服务超时时间 timeout client 30s # 客户端超时时间 timeout server 30s # Server超时时间
frontend http-in # 定义前台服务名称为http-in bind *:80 # 定义http-in所监听的端口 default_backend backend_servers # 定义后台服务名称 option forwardfor # 发送X-Forwarded-For头部信息
backend backend_servers # 定义后台服务名称为backend_server balance roundrobin # 定义负载均衡算法为roundrobin server node2.1000cc.net 192.168.10.12:80 check # 定义负载均衡算法为roundrobin server node3.1000cc.net 192.168.10.13:80 check # 定义负载均衡算法为roundrobin

[root@node1 ~]# systemctl enable --now haproxy
2) 配置Rsyslog用以获取HAProxy日志 [root@node1 ~]# vim /etc/rsyslog.conf ...... ...... ...... ...... ...... ......
# 取消15,16行注释,添加17行信息。修改成为以下内容 $ModLoad imudp $UDPServerRun 514 $AllowedSender UDP, 127.0.0.1
...... ...... ...... ...... ...... ......
# 修改55行,禁止local2日志信息记录至message.添加56行将local2获取的信息写入至haproxy.log中 *.info;mail.none;authpriv.none;cron.none;local2.none /var/log/messages local2.* /var/log/haproxy.log
[root@node1 ~]# systemctl restart rsyslog
3) 配置httpd.conf # 配置node2节点 [root@node2 ~]# vim /etc/httpd/conf/httpd.conf # 修改196行,如下面内容 LogFormat "\"%{X-Forwarded-For}i\" %l %u %t \"%r\" %>s %b \"%{Referer}i\" \"%{User-Agent}i\"" combined
[root@node2 ~]# systemctl restart httpd
# 配置node3节点 [root@node2 ~]# vim /etc/httpd/conf/httpd.conf # 修改196行,如下面内容 LogFormat "\"%{X-Forwarded-For}i\" %l %u %t \"%r\" %>s %b \"%{Referer}i\" \"%{User-Agent}i\"" combined
[root@node3 ~]# systemctl restart httpd
4) 客户端测试Layer7负载均衡 [root@node5 ~]# curl node1.1000cc.net node2.1000cc.net [root@node5 ~]# curl node1.1000cc.net node3.1000cc.net [root@node5 ~]# curl node1.1000cc.net node2.1000cc.net [root@node5 ~]# curl node1.1000cc.net node3.1000cc.net
5) 停止node2节点的httpd服务,客户端再进行测试 # 不在显示node2节点的信息,也没有连接报错 [root@node5 ~]# curl node1.1000cc.net node3.1000cc.net [root@node5 ~]# curl node1.1000cc.net node3.1000cc.net [root@node5 ~]# curl node1.1000cc.net node3.1000cc.net [root@node5 ~]# curl node1.1000cc.net node3.1000cc.net
6) 重启node2节点的httpd服务,客户端再进行测试 # 再次正常显示node2节点的信息 [root@node5 ~]# curl node1.1000cc.net node3.1000cc.net [root@node5 ~]# curl node1.1000cc.net node2.1000cc.net [root@node5 ~]# curl node1.1000cc.net node3.1000cc.net [root@node5 ~]# curl node1.1000cc.net node2.1000cc.net
3. 设置SSL
1) 创建SSL证书
[root@node1 ~]# cd /etc/pki/tls/certs
[root@node1 certs]# openssl req -x509 -nodes -newkey rsa:2048 -keyout \
/etc/pki/tls/certs/haproxy.pem -out /etc/pki/tls/certs/haproxy.pem \
-days 365
Generating a 2048 bit RSA private key
.....................+++
.................................................................+++
writing new private key to '/etc/pki/tls/certs/haproxy.pem'
-----
You are about to be asked to enter information that will be incorporated
into your certificate request.
What you are about to enter is what is called a Distinguished Name or a DN.
There are quite a few fields but you can leave some blank
For some fields there will be a default value,
If you enter '.', the field will be left blank.
-----
Country Name (2 letter code) [XX]:CN
State or Province Name (full name) []:BeiJing
Locality Name (eg, city) [Default City]:BeiJing
Organization Name (eg, company) [Default Company Ltd]:1000cc
Organizational Unit Name (eg, section) []:tech
Common Name (eg, your name or your server's hostname) []:node1.1000cc.net
Email Address []:
2) 配置HAProxy [root@node1 ~]# vim /etc/haproxy/haproxy.cfg global log 127.0.0.1 local2 info chroot /var/lib/haproxy pidfile /var/run/haproxy.pid maxconn 256 # 设置SSL最大连接数 maxsslconn 256 # 设置SSL加密信息 tune.ssl.default-dh-param 2048 user haproxy group haproxy daemon
defaults mode http log global option httplog timeout connect 10s timeout client 30s timeout server 30s
frontend http-in bind *:80 # 定义SSL监听的端口及秘钥所在路径及文件名 bind *:443 ssl crt /etc/pki/tls/certs/haproxy.pem default_backend backend_servers option forwardfor
backend backend_servers balance roundrobin server node2.1000cc.net 192.168.10.12:80 check server node3.1000cc.net 192.168.10.13:80 check
[root@node1 ~]# systemctl restart haproxy
3) 客户端测试 [root@node5 ~]# curl https://node1.1000cc.net node3.1000cc.net [root@node5 ~]# curl https://node1.1000cc.net node2.1000cc.net
# 如果出现以下问题 curl: (60) Peer's certificate issuer has been marked as not trusted by the user. More details here: http://curl.haxx.se/docs/sslcerts.html ...... ...... ...... ...... ...... ......
# 解决方法,将haproxy.pem加入至本地的ca-bundle.crt文件中 [root@node5 ~]# scp root@node1.1000cc.net:/etc/pki/tls/certs/haproxy.pem ./ [root@node5 ~]# cat ~/haproxy.pem >> /etc/pki/tls/certs/ca-bundle.crt
4. 监测HAProxy状态
4.1 HAProxy状态-WEB模式
1) 配置HAProxy配置文件
[root@node1 ~]# vim /etc/haproxy/haproxy.cfg
......
......
......
......
......
......
# 开启HAProxy Stats页面 frontend http-in bind *:80 bind *:443 ssl crt /etc/pki/tls/certs/haproxy.pem default_backend backend_servers option forwardfor stats enable # 启HAProxy Stats页面 stats auth snow:123456 # 设定登录页面所需的账户名及密码 stats hide-version # 隐藏HAProxy版本 stats show-node # 显示HAProxy主机名 stats refresh 60s # 状态信息刷新时间60s一次 stats uri /haproxy-status # 登录的页面 ...... ...... ...... ...... ...... ......
[root@node1 ~]# systemctl restart haproxy
2) 客户端浏览器访问HAProxy状态监测页面
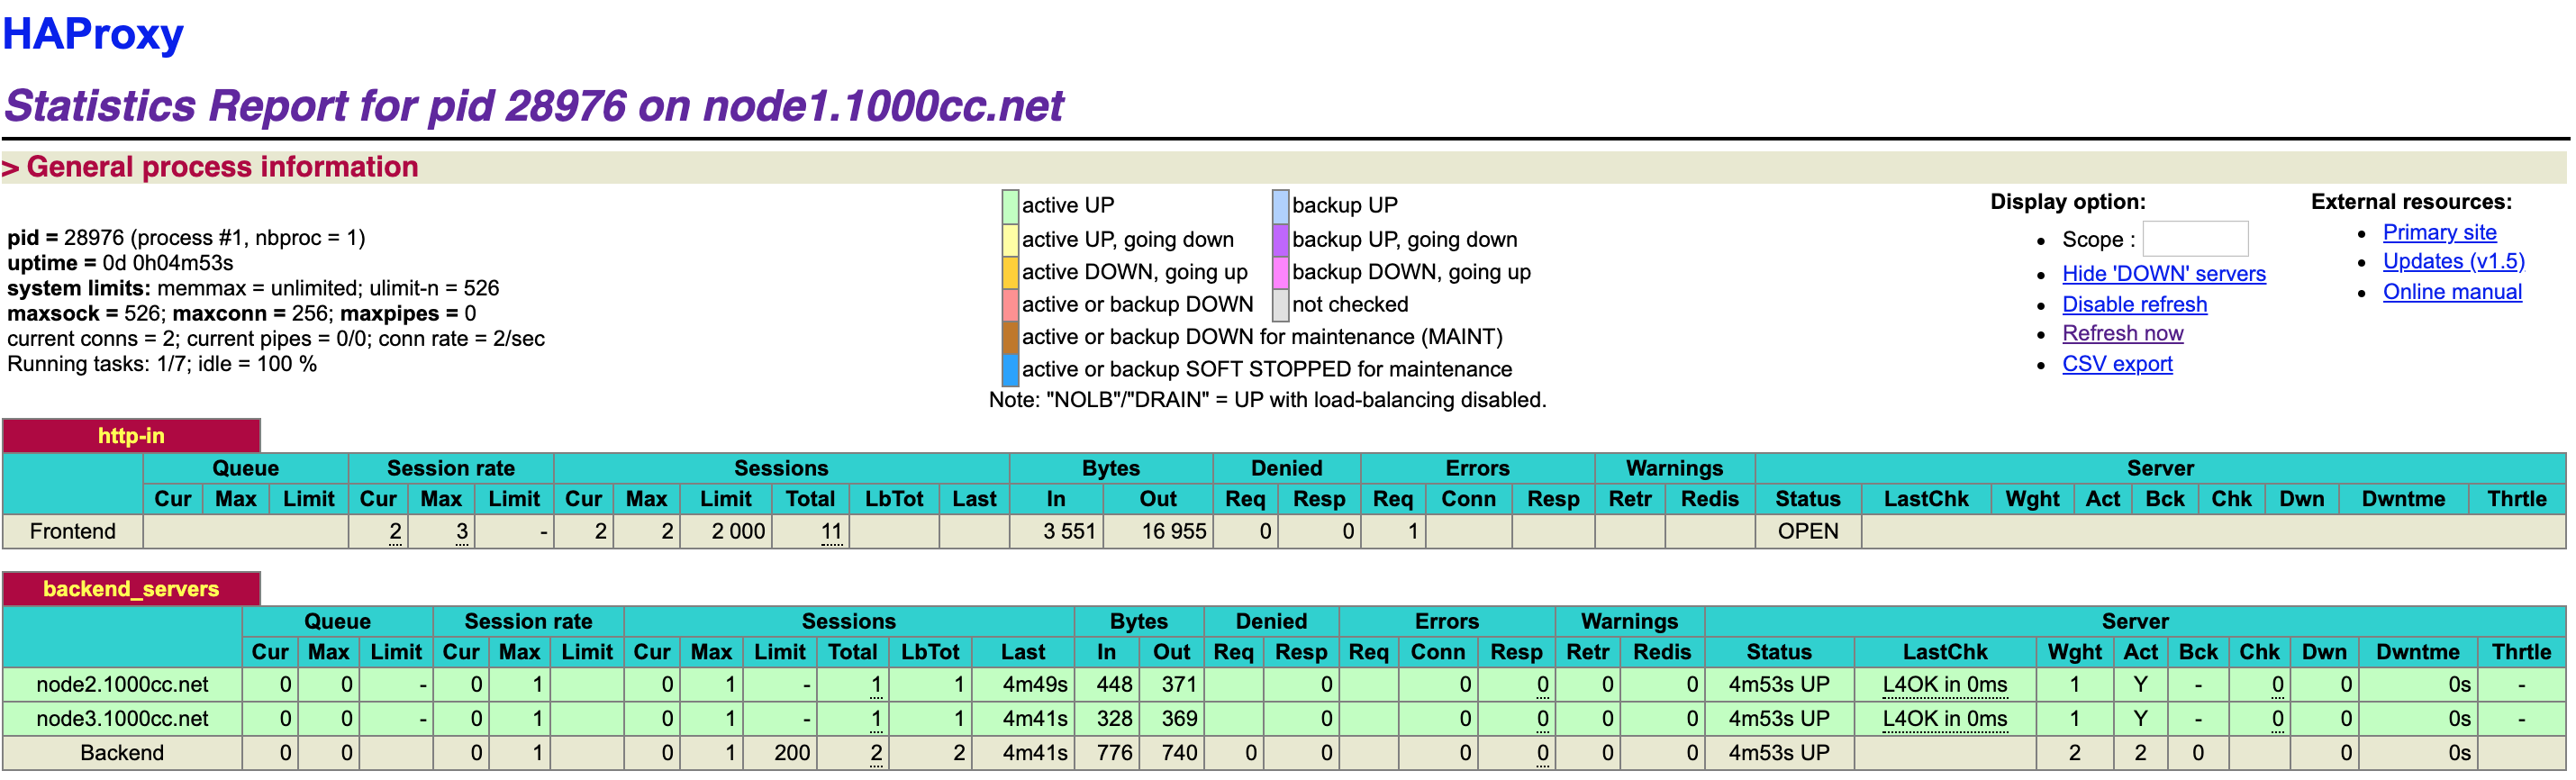
4.2 查看HAProxy状态-CLI模式
1) 配置HAProxy配置文件
[root@node1 ~]# vim /etc/haproxy/haproxy.cfg
# 开启HAProxy Stats页面
global
    log 127.0.0.1 local2 info
    chroot /var/lib/haproxy
    pidfile /var/run/haproxy.pid
    stats socket /var/lib/haproxy/stats    # 绑定socket
    maxconn 256
    maxsslconn 256
    tune.ssl.default-dh-param 2048
    user haproxy
......
......
......
......
......
......
[root@node1 ~]# systemctl restart haproxy
2) 访问HAProxy状态 [root@node1 ~]# yum install socat -y (1) 显示当前状态 [root@node1 ~]# echo "show info" | socat /var/lib/haproxy/stats stdio Name: HAProxy Version: 1.5.18 Release_date: 2016/05/10 Nbproc: 1 Process_num: 1 Pid: 28994 Uptime: 0d 0h05m13s Uptime_sec: 313 Memmax_MB: 0 Ulimit-n: 546 ...... ...... ...... ...... ...... ...... Tasks: 7 Run_queue: 1 Idle_pct: 100 node: node1.1000cc.net description:
(2) 显示状态和CVS信息 [root@node1 ~]# echo "show stat" | socat /var/lib/haproxy/stats stdio # pxname,svname,qcur,qmax,scur,smax,slim,stot,bin,bout,dreq,dresp,ereq, econ,eresp,wretr,wredis,status,weight,act,bck,chkfail,chkdown,lastchg, downtime,qlimit,pid,iid,sid,throttle,lbtot,tracked,type,rate, rate_lim,rate_max,check_status,check_code,check_duration,hrsp_1xx,hrsp_2xx, hrsp_3xx,hrsp_4xx,hrsp_5xx,hrsp_other,hanafail,req_rate,req_rate_max,req_tot, cli_abrt,srv_abrt,comp_in,comp_out,comp_byp,comp_rsp,lastsess, last_chk,last_agt,qtime,ctime,rtime,ttime,httpin,FRONTEND,,,0,0,2000,0,0,0,0, 0,0,,,,,OPEN,,,,,,,,,1,2,0,,,,0,0,0,0,,,,0,0,0,0,0,0,,0,0,0,,,0,0,0,0,,,,,,,, backend_servers,node2.1000cc.net,0,0,0,0,,0,0,0,,0,,0,0,0,0,UP,1,1,0,0,0,405,0 ,,1,3,1,,0,,2,0,,0,L4OK,,0,0,0,0,0,0,0,0,,,,0,0,,,,,-1,,,0,0,0,0,backend_servers, node3.1000cc.net,0,0,0,0,,0,0,0,,0,,0,0,0,0,UP,1,1,0,0,0,405,0,,1,3,2,,0,,2,0,,0, L4OK,,0,0,0,0,0,0,0,0,,,,0,0,,,,,-1,,,0,0,0,0,backend_servers,BACKEND,0,0,0,0,200, 0,0,0,0,0,,0,0,0,0,UP,2,2,0,,0,405,0,,1,3,0,,0,,1,0,,0,,,,0,0,0,0,0,0,,,,,0,0, 0,0,0,0,-1,,,0,0,0,0,
(3) 显示当前会话 [root@node1 ~]# echo "show sess" | socat /var/lib/haproxy/stats stdio 0x55f9a923ed10: proto=unix_stream src=unix:1 fe=GLOBAL be=<NONE> srv=<none> ts=0b age=0s calls=1 rq[f=c08200h,i=0,an=00h,rx=10s,wx=,ax=] rp[f=008000h,i=0,an=00h,rx=,wx=,ax=] s0=[7,8h,fd=1,ex=] s1=[7,8h,fd=-1,ex=] exp=
(4) 进入交互模式 [root@node1 ~]# socat readline /var/lib/haproxy/stats prompt # 敲入prompt命令后回车
> help ...... ...... ...... ...... ...... ...... > quit [root@node1 ~]#
5. 实现HAProxy-Layer4集群
1) 拓扑
                           |-------------|
                           |    Client   |
                           |    node5    |
                           |-------------| 
                                  |
                                  |
                           |-------------|
                           |   HA Proxy  |
                           |    node1    |
                           |-------------| 
                                  |
                                  |
            |--------------|      |       |--------------|
            +   DB Server  +--------------+   DB Server  +
            |     node2    |              |     node3    |
            |--------------|              |--------------|
2) 安装HAproxy程序 [root@node1 ~]# yum install haproxy -y [root@node1 ~]# mv /etc/haproxy/haproxy.cfg /etc/haproxy/haproxy.cfg.bak [root@node1 ~]# vim /etc/haproxy/haproxy.cfg global log 127.0.0.1 local2 info chroot /var/lib/haproxy pidfile /var/run/haproxy.pid maxconn 256 user haproxy group haproxy daemon
defaults mode tcp log global timeout connect 10s timeout client 30s timeout server 30s
frontend mariadb-in bind *:3306 default_backend backend_db
backend backend_db balance roundrobin server node2.1000cc.net 192.168.10.12:3306 check server node3.1000cc.net 192.168.10.13:3306 check

[root@node1 ~]# systemctl restart haproxy
3) 客户端安装MariaDB # 设置node2节点 [root@node2 ~]# yum install mariadb-server -y [root@node2 ~]# systemctl restart mariadb [root@node2 ~]# mysql_secure_installation [root@node2 ~]# mysql -u root -p Enter password: ...... ...... MariaDB [(none)]> create database node2; Query OK, 1 row affected (0.00 sec)
MariaDB [(none)]> grant all privileges on node2.* to snow@'localhost' identified by '123456'; Query OK, 0 rows affected (0.00 sec)
MariaDB [(none)]> grant all privileges on node2.* to snow@'%' identified by '123456'; Query OK, 0 rows affected (0.00 sec)
MariaDB [(none)]> quit Bye
# 设置node3节点 [root@node3 ~]# yum install mariadb-server -y [root@node3 ~]# systemctl restart mariadb [root@node3 ~]# mysql_secure_installation [root@node3 ~]# mysql -u root -p Enter password: ...... ...... MariaDB [(none)]> create database node3; Query OK, 1 row affected (0.00 sec)
MariaDB [(none)]> grant all privileges on node3.* to snow@'localhost' identified by '123456'; Query OK, 0 rows affected (0.00 sec)
MariaDB [(none)]> grant all privileges on node3.* to snow@'%' identified by '123456'; Query OK, 0 rows affected (0.00 sec)
MariaDB [(none)]> quit Bye
4) 客户端测试 [root@node5 ~]# yum install mariadb -y
[root@node5 ~]# mysql -h node1.1000cc.net -u snow -p -e 'show databases;' Enter password: +--------------------+ | Database | +--------------------+ | information_schema | | node2 | +--------------------+
[root@node5 ~]# mysql -h node1.1000cc.net -u snow -p -e 'show databases;' Enter password: +--------------------+ | Database | +--------------------+ | information_schema | | node3 | +--------------------+


如对您有帮助,请随缘打个赏。^-^

gold